Do you want to learn how to draw an owl like a pro? It’s actually not as difficult as you might think! In this comprehensive guide, we will teach you how to draw an owl step by step. This tutorial is perfect for artists of all skill levels. We will cover everything from the basics of owl anatomy to the finer details of shading and coloring. With our helpful tips and step-by-step instructions, you will be able to create your very own owl masterpiece!

Mystical World Of Owls
Owls are one of the most mysterious animals in existence. They are known for their nocturnal habits and silent flight, which makes them excellent hunters. Owls have long been used as symbols of wisdom throughout history due to their large eyesight (especially when compared to other birds).
Facts About Owls
There are around 200 different owl species in the world, and they can be found on every continent except Antarctica. Owls vary greatly in size, from the tiny elf owl which is just six inches tall, to the giant Eurasian eagle-owl which can weigh up to 18 pounds!
Owls have a wide variety of diets, but most of them prefer small mammals such as rodents, rabbits, and bats. Some owl species also hunt birds, insects, and fish.
Some owl species, like the barn owl, are considered “ecosystem engineers” because they play an important role in controlling rodent populations. Barn owls consume large numbers of rodents every year, preventing them from overpopulating and damaging crops or infrastructure.

The Physical Anatomy Of an Owl
The physical anatomy of an owl is unique among birds. The most prominent feature is its large eyes and forward-facing ears, which help it see in almost complete darkness. An owl’s beak is hooked at the end for tearing prey apart, and its talons are very strong (but not sharp).
When drawing an owl, it is important to understand its basic anatomy. Let’s take a closer look at some of the most important features:
Head And Beak
Owls have large forward-facing eyes which give them excellent vision in the dark. They also have a facial disk that helps them funnel sound towards their ears. This allows them to pinpoint prey even in complete darkness! They also can rotate their heads up to 270 degrees and have a strong beak which is perfect for tearing apart prey.
Body
Owls are relatively stocky animals, with broad wings and short tails. Owls have a thick layer of feathers that cover their bodies – these provide protection from cold weather as well as help them to fly silently through the air!
Wings
Owls also have wings, which are made up of many small bones called primaries and secondaries connected by quills (feathers). These wings help owls to fly silently through the air so they can catch prey without making any noise! They have unique “fingers” on their wings that help them grasp prey.
Feet
Owls have relatively long legs compared to their body size. Their feet are extremely powerful and feature sharp talons that can grip prey tightly.

Supplies For Owl Drawing
You will need some materials to start drawing your owl. We have put together a concise list of the supplies you’ll need for this tutorial:
Pencils And Eraser
These are necessary tools when it comes to sketching out ideas on paper or even creating finished drawings from scratch! You can use any kind of pencil, but we recommend using HB (hard) grade as these work best with graphite pencils which is what most artists use for their artwork.
Paper Or Notebook
This can be helpful if you want something to write down notes about what type of owl you’re going to draw so that later when it’s time to do the actual drawing part there won’t be anything distracting like having an idea only halfway through trying not to forget what the other half was supposed to be!
Colored Pencils
Colored pencils are an easy way for beginners who want their drawings to look like professional work without spending too much money on expensive supplies. These types of colored pencils will allow you to add color and shading into your drawings as well as make it easier when trying out different ideas without having them look so plain white all over again (especially if using graphite).
Markers
Markers are another good option if you’re looking for an easier way to add color and shading into your drawings without spending too much money on expensive supplies. These types of markers allow you to create different colors by blending them together which makes it perfect when trying out ideas that may not work well with just one single shade or hue being used all over again.
Reference Photo
It is often helpful to have a reference photo of the owl you are trying to draw, as this can give you an idea as to what specific features you should be paying attention to. If you don’t have any photos lying around, there are plenty of websites that offer free high-resolution owl photos for download so that you can print them out or save them digitally on your computer.
Basics Of Owl Drawing
Now that you know a little bit about owl anatomy and have all of the necessary supplies, let’s take a closer look at how to draw one!
The head is probably the most important part of an owl when it comes to drawing, as this is where all of its features are located. When starting out, try sketching out a basic outline for the shape of the head including the beak and eyes. It’s also important to note how big or small you want your owl’s head in comparison to its body size – usually, owls with larger heads are depicted as being more aggressive or formidable looking.

From there, begin adding in details like the eyebrows, feathers, and any other markings that your owl may have. Don’t forget to add in the pupils of the eyes – these should be large and black in order to make your owl look extra piercing!
The body of an owl is typically cylindrical in shape, so try drawing out a basic outline for this starting with the chest and stomach area. Be sure to add wings and legs as well, noting how long you want them to be in comparison to the body size.
Lastly, don’t forget about the tail! This can either be short or long depending on the specific type of owl you’re trying to draw, but typically it’s best to keep it somewhere in between. Finish off your drawing by adding final details like color and shading and you’re done!
How to Make Owl Drawings Look More Realistic
One way to make your owl drawings look more realistic is by using shading techniques. This means adding darker values around the contours of the body, wings, and legs, as well as on the beak and eyes. You can also add some highlights for extra effect.
Another way to give your owls a more lifelike appearance is by paying attention to detail – making sure that all the feathers are properly shaped and that there are no visible erasing marks.

Last but not least, try studying real-life owls so you can get an idea of how they look in person; this will help give you an idea of what kind of poses to draw them in as well!
How to Draw an Owl Easy Step-by-Step Tutorial
Now that we’ve covered some basics about drawing owls, let’s get started on our tutorial!
Option One: How to Draw an Owl For Kids
If you’re looking for an easy way to draw an owl, then this tutorial is perfect. It teaches you how in simple steps that any child can follow along with!
Step 1
Draw two curved “W”s for the owl’s feet. Make a curve at the top and bottom of each “W.”

Step 2
Draw the branch of the tree where you’ll put the owl with two parallel lines.

Step 3
Draw the owl’s body. Draw a curved line that comes down and connects to the branch. Don’t forget to draw about the tail under the branch.

Step 4
Add ears. Draw two diagonal lines and connect them for the top of your owl’s head.

Step 5
Add big eyes and a beak to the owl.

Step 6
Draw the feathers on the owl’s forehead and body by adding zigzag lines.

Step 7
Add the tail feathers by drawing several vertical lines going down.

Step 8
Add more feathers to your owl by making “U” curved lines at the body.

Step 9
Color your owl. You can use any colors you like! Your easy step-by-step owl drawing is now complete!

Option Two: Drawing Realistic Barn Owl
If you’re looking for a more in-depth tutorial that covers how to draw an owl step by step for adults, then this option is perfect for you. In this tutorial, we’ll be drawing a realistic barn owl using shading and blending techniques to make it look extra lifelike!
Start out by sketching out the basic outline of your owl. This includes the head, body, wings, and legs. It’s ok if your lines are messy or uneven at this stage – we’ll be cleaning them up later on.
Step 1: Sketch a circle
Begin by drawing a large circle as a guide for the owl’s head.

Step 2: Sketch the lines for the face
As a guide for the owl’s face, draw two intersecting lines within the head. They should be bent to follow the form of the circle.

Step 3: Sketch the upper half of the body
Draw a new circle on the lower right side of the head. The top part of the owl’s body will be outlined by this circle. This circle should be slightly bigger than the first one. Their edges are only grazing slightly.

Step 4: Sketch the lower half of the body
Draw a long, U-shaped curve on the lower right side of the second circle. It will serve as a guide for the lower half of the body.

Step 5: Sketch the neck
Create the neck. Connect the head to the body with two lines.

Step 6: Sketch the feet
Draw the feet’s guide lines. Under the body, draw four short straight lines.

Step 7: Sketch the wing tips
On the lower right side of the body, add a guide for the wing tip by drawing a smaller U-shaped arc.

Your initial sketch is complete! Once you have a basic outline of your owl drawn in, begin adding in more details like the eyebrows, ears, and feathers.
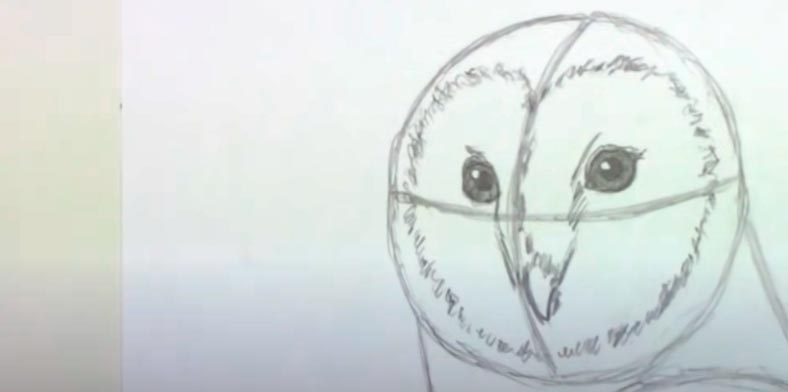
Step 8: Draw the eyes
The eyes should be ovals with pointed tips. Because of perspective, the left eye should be smaller. Follow the lines as guides for placement.
To represent glare, make a small circle in each eye. To create the true eyeball, darken the edges of the eyes. Inside each eye, make a slightly bigger circle and paint it in for the pupils.
Add more value to the rest of the eyes. Make sure they aren’t as dark as the pupils. For more realism, add a few tiny lines around the eyes.

Step 9: Draw the feathers that cover the top part of the beak
The intersecting lines can be a guide. The feathers form a V-like shape that begins between the eyes and travels down toward the guide line. To show the fluffy feathers, use quick, short strokes.
Align the two lines so they meet in the middle, then draw the middle ridge feathers following the guide line.

Step 10: Draw the beak
Add a tiny, pointed, angular shape beneath the feathers for the beak.

Step 11: Draw the face
Use the main circle and lines as a guide to draw the heart-shaped face. Start at the top of the guide line and work your way down the inner path of the circle, adding the feathers. Draw short, quick strokes to create a fluffy texture and stay inside of the main circle in order for it to look like a rounded bottom rather than pointy.
Step 12: Draw the outer layer of the face
Simply follow the path and add thicker, curvier lines on the outside of the heart to make it thicker.

Step 13: Draw the head
Use the main circle as a guide. Make the lines on the top section of the head darker and broaden it.

Step 14: Draw the leg
Use the lines at the bottom as a guide. Make the top section of the leg thicker by following the path of the longest line. Use quick, short strokes for the feathers. To make the toes, thicken all remaining lines at the bottom.
Draw a pointy curved line for the talons at the end of each toe. Owls have two toes that point forward and two that point backward. Only draw the toes that are visible.

Step 15: Draw another leg
Draw the opposite leg. The majority of it is hidden behind the first leg, so just draw the visible portion.

Step 16: Draw the first part of the wing
Use the beginning forms as a basis for your work. To draw the outer portion of the main wing, use a succession of straight and curved lines. The wing’s form arcs across the center of the two initial shapes.

Step 17: Add the feathers inside the wing
Don’t worry about having to draw every single feather. Simply create a few lengthy, curving lines inside to represent the wing’s basic texture. Continue by adding numerous long, curved lines throughout the rest of the wing. To complete the wing, make a line down all the way to that U-shaped indentation on the lower right side that appears to be tail but is actually the wingtip.

Step 18: Draw the rest of the body
You may use the remaining lines as guides. For the short tail feathers, draw a few curved lines between the feet and wingtip.

Step 19: Erase the initial sketch
Erase as much as you can of the initial guide lines for a cleaner look. Don’t worry about erasing them all. Also re-draw any final sketch lines that you may have accidentally erased.

Now it’s time to start adding some shading to your owl. This will help give your owl more depth and realism.
Step 20: Add shading
To give your drawing more depth and volume, add some shading to it. When shading, choose the direction of the light source so that the shadows are consistent with it. To obtain various degrees of tonal value, vary the pressure on your pencil.

Step 21: Add details
Make sure you add more value throughout your drawing for greater clarity. To keep the owl grounded, draw a cast shadow underneath. You may use a reference to be as accurate as possible.

Step 21: Add speckles
Finally, draw some speckles here and there on the wing for more complexity. The speckles are simple oval shapes with some shading on them.

And there you go – your very own owl! If you’d like to, you can add a background scene for even more realism. You could also try adding different colors if you want your owl to be in a specific setting (e.g. winter, autumn, etc.). Have fun with it and happy drawing!
Tips For Drawing Owls
Here are a few helpful tips to keep in mind when drawing owls:
- Pay attention to the proportions of your owl. This means making sure that the head is not too large or small in comparison to the body, and that the wings and legs are neither too long nor too short.
- Use a light pencil to sketch out the basic shape of the owl. You can always erase any mistakes later on.
- When drawing the feathers, make sure they are all different sizes and shapes. This will give your owl more realism.
- Be careful not to make your owl too fluffy! Keep the details realistic so it doesn’t look like a cartoon character.
- Be careful with how many colors you add – overdoing it can quickly make your owl drawings look messy or amateurish. Try sticking with two or three main colors max and use shades/hues for added depth.
- Take your time when drawing owls – they’re not as simple as they may seem! By practicing and following the tips listed above, you’ll be able to create perfectly drawn owls in no time at all.
People Also Ask
Final Words
So there you have it – everything you need to know about how to draw an owl! Be sure to practice often and don’t give up if your drawings don’t turn out perfect on the first try. With a bit of patience and lots of hard work, you’ll be able to create beautiful owl drawings that will amaze everyone who sees them. Thanks for reading!