There is something undeniably special about cats. They are one of the most popular pets in the world for a reason! In this article, we will teach you how to draw a cat. This comprehensive guide includes everything from the basics of proportion and construction lines to adding detail and shading. We will also answer some common questions that people have about drawing cats. So whether you’re a beginner or an experienced artist, there’s something here for everyone!

Why Draw Cats?
There are a number of reasons why you might want to learn how to draw cats. Maybe you’re an animal lover and have always wanted your own pet cat, but don’t have the time or space for one. Drawing cats can be a great way to enjoy some of the benefits of owning a cat without having to deal with all the responsibility!
Or maybe you just think they’re adorable creatures and want to be able to capture their likeness on paper. In any case, learning how to draw cats is definitely worth your time. Cats are popular pets around the world for good reason – they’re fascinating animals with unique personalities.
We hope you enjoy this tutorial and find it useful! Remember that practice makes perfect, so don’t give up if at first you don’t succeed in capturing the cat’s likeness on paper – keep trying until you get there (and then try some more).
Before You Start Drawing
Before you start drawing, there are a few things you should consider. First of all, what kind of cat do you want to draw? There are many different breeds out there with varying body shapes and sizes – this will affect how your drawings turn out! Secondly, where is your subject located? Is it sitting still or moving around quickly (in which case we recommend using quick sketching techniques)? Finally, what mediums do you have available for use in creating an image on paper such as pencils crayons markers etcetera?

Get Familiar With the Basics Of Cat Anatomy
One of the most important things you can do before starting to draw cats is to familiarize yourself with their anatomy. This means understanding how a cat’s body is proportioned and what features are unique to them.
The basic rule of thumb is that the head should be about one-eighth of the total body length, and the body should be twice as long as it is tall. Note that this may vary depending on the breed of cat you’re drawing.
In addition to getting the proportions right, it’s also important to understand which features are unique to cats. For example, they have smaller ears than dogs, and their eyes are typically round and their pupils vertical. By understanding these features, you’ll be able to accurately capture a cat’s likeness in your drawings.
Observe the Cat’s Grace And Movements
Cats are known for their grace and agility, so it is important to observe these qualities when drawing them. You can do this by watching videos of cats online or visiting a local animal shelter where there are many different types of felines roaming around freely!
In addition to observing how they move, you should also pay attention to the way they carry themselves. This includes things like whether they walk with confidence or shyness; if they sit upright on their hind legs while playing games such as fetching string toys from under couches (this will help determine which poses might be best suited for your drawings).

Collect Reference Photos
Now that you understand the basics of cat anatomy and movement, it’s time to start collecting reference photos. This is simply a collection of images (preferably high-quality ones) of cats in different poses and situations.
You can find reference photos online by doing a simple Google search or browsing through photo galleries. If you’re lucky, you might even be able to find some good shots of your own pet cat! Having a variety of reference photos will give you a range of options when drawing your subject – so make sure to gather as many as possible.
Gather Your Art Materials
Before you can draw anything, it’s important to have the right tools. There are many different types of materials available for artists; but as a beginner, we recommend using graphite pencils on drawing paper because they’re easy and inexpensive.
You will need some basic supplies:
- Graphite Pencils (HB through B)
- Drawing Paper
- Tissue/Paper Towel (optional)
This is just what we use when learning how to draw cats! You may find other things helpful too such as erasers or colored pencils, so feel free to experiment with different materials until you find something that works best for your needs.
Now that we’ve covered some of the basics, let’s get started!
How to Draw a Cat Face: Step by Step Tutorial
When learning how to draw a cartoon cat, the face is usually one of the first things people want to tackle. This tutorial will break down the process of drawing a cat face in simple steps.
Step One: Draw an Oval
Sketch out the basic shape of the cat’s head using an HB pencil. The face should be oval-like in shape. Draw two intersecting lines in the middle of the head to help you place the features correctly.

Step Two: Sketch the Muzzle
Use an HB pencil to sketch the muzzle. Start by drawing a pointy triangle in the center of the face, and then add two curved lines on either side for the cheeks. Finally, add the mouth. The shape of the muzzle may vary depending on the breed of cat you’re drawing.

Step Three: Add Shapes For the Eyes
Draw two ovals for the eyes. They should be about halfway down the face. Don’t worry about making them perfect – we’ll clean everything up later!

Step Four: Draw the Ears
Draw two curved triangles for the ears. They should be about as long as they are wide at their widest point. Place them above each eye, but make sure they aren’t too close!

Step Five: Refine the Shape Of the Head
Now that you have all the basic shapes in place, it’s time to refine their outlines and make them look more like a cat. Make the oval more pointy at the sides.

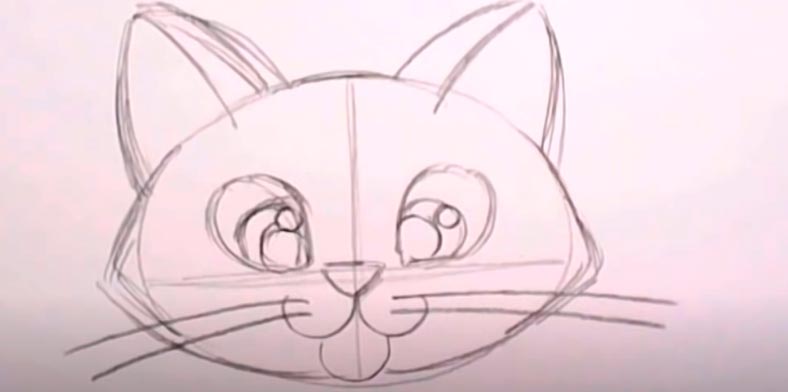
Step Six: Add Details To the Eyes
The eyes should be almond-shaped, with the top part slightly wider than the bottom. Add some more details to the eyes by drawing small circles in each one. These will be for the pupils and irises.

Step Seven: Add Whiskers
Draw a few whiskers on either side of the muzzle. They should be thin and slightly curved.
Step Eight: Make the Outline Darker
To make your drawing look more finished, go over the outline with a dark pencil or a marker. This will help it stand out against the background.

Step Nine: Erase any mistakes
Use an eraser to erase any stray lines or mistakes.

Step Ten: Add Details
Add some extra lines and shading to the eyes and ears to make them stand out from the rest of the face. Make sure there is enough contrast between your lightest lights and darkest darks so that everything looks realistic in relation to each other when finished with all steps of drawing cats’ faces tutorial.

So there you have it! You now know how to draw a basic cat face. This tutorial can be adapted for any breed of cat, so feel free to experiment with different features. You can also try adding color for a more finished look.
How to Draw a Realistic Cat: Step by Step Tutorial
Now that you know the basics of how to draw cats, let’s take it up a notch and learn how to draw a realistic cat. This tutorial will walk you through the process of drawing a realistic cat from scratch.
Step One: Draw Two Circles
Draw two circles for the body. They should be about as wide as they are tall, and spaced apart just a bit.

Step Two: Draw a Small Circle
Draw a small circle above the right larger one. This will be for the head.

Step Three: Draw Two Intersecting Lines Inside the Head Circle
Draw two intersecting lines in the middle of the head circle. These will help you draw the features in the right place.

Step Four: Draw Triangles for the Ears
Draw two triangles on the top of the head, pointing towards the outside.

Step Five: Connect the Major Shapes With Lines
Connect the circles and the head circle with lines. This will help you form the cat’s body.

Step Six: Draw a Guide For the Tail
Draw a curved line on the left side of the body. This will be used in drawing the tail.

Step Seven: Draw the Guides For the Feet
Draw four lines below the body. These will be used to draw the feet.

Step Eight: Draw the Eyes and Pupils
Draw the eyes, which should be slightly slanted. Draw a small circle in each eye. They should be touching the lines in the head circle. Inside each eye, draw a small black dot for the pupils.

Step Nine: Draw the Nose, the Mouth, and the Muzzle
Draw the nose, which should be a small upside-down triangle. The mouth is just a curved line below the nose. The muzzle is two U-shape lines that touch the mouth. Draw multiple lines on each side of the muzzle. These are your cat’s whiskers.

Step Ten: Draw the Ears And the Fur On the Head
Use the guide lines to draw the ears and the head. Make quick, short strokes to give them a furry look.

Step Eleven: Draw the Tail
Draw the tail by thickening the guide line. It should be long and curved.

Step Twelve: Draw the Hind Legs
Draw the hind legs using the guide lines. Add three small lines at the bottom for toes.

Step Thirteen: Draw the Front Legs
Draw the front legs using the same technique.

Step Fourteen: Draw the Body
Draw the body using guide lines. Add the fur by making quick, short strokes.

Step Fifteen: Erase the Guide Lines
Erase the guide lines. Redraw any lines that need it.

Step Sixteen: Add Shading And Stripes
Shade the cat using a pencil. Add darker strokes around the eyes, nose, and mouth. Give the fur a fluffy look by adding lots of strokes in different directions. Also, add a cast shadow underneath the cat.

And that’s it! You’ve now drawn a realistic cat from scratch. Congratulations!
Tips For Drawing Cats
- Start by studying your reference photo closely, and take note of the specific shapes and proportions of the cat’s face.
- When starting out, it can be helpful to practice by sketching out basic shapes like rectangles or circles first. This will help you get comfortable with the proportions of a cat’s body before moving on to more intricate details.
- Draw lightly at first so that you can make changes easily. You can always go over lines later with a darker pencil or marker to make them more visible.
- Cats are often portrayed as being very agile and graceful creatures; try to capture this movement in your drawings by making sure your lines are fluid and expressive.
- Don’t forget the whiskers! They play a very important role in helping to define a cat’s facial features.
- When drawing cats from different angles, be aware of things like perspective and foreshortening. This will help you create more accurate depictions of your subject matter.
- When drawing fur, use short, light strokes rather than long, continuous lines. This will give it a more realistic texture.
- Pay attention to the highlights and shadows on your cat’s fur, and use different shades to create a realistic effect.
- Add details such as whiskers, eyebrows, and eyelashes for extra realism.
- If you’re not happy with a particular part of your drawing, don’t be afraid to erase it and start over. With practice, you’ll get better at capturing your cat’s unique features on paper!
Final Words
Congratulations – you’ve now learned to draw cats like a pro! In case you need help with proportions or getting things just right, be sure to check out our other tutorials on how to draw animals which should give you all the guidance you need. And remember – practice makes perfect! So keep sketching every day and soon enough your drawings will be so lifelike that even professional artists would be proud to call them their own.