Drawing a rope is not as hard as it seems, and with the right tips and tricks, you can create a beautiful-looking rope in no time! Whether you’re an artist who wants to get better at drawing ropes or just someone who needs to know how to draw one for your favorite cartoon character, this article has something for everyone.

We offer useful tips on where to start, what colors are needed, and other helpful hints.
Basics
Why Draw a Rope
The reasons why you would want/need to learn how to draw rope can be many depending on your skill level or profession.
Ropes are found in many images, including cartoons, comics, paintings, and sculptures. They can be used as a background element to set the mood of an image or simply to illustrate how something is attached. Ropes are also popular components for doodles because they are easy to draw!
How to Begin
The first thing you will need to do before drawing a rope is practice sketching an object. By practicing on other objects or even just thick lines instead of spending hours trying to draw your perfect rope can save you lots of time in the long run.
Once that’s done, go ahead and move on to finalizing your lines with ink pens or thin marker strokes – whatever works best for you! It doesn’t matter if you’re not good at drawing yet – this is just a rough draft!

What Colors to Use
It’s important to add color when rendering your rope, but it can be daunting for beginners. The best way to figure out what colors are needed is by looking at the reference material that inspired your art.
Drawing Details
You can use pen and ink to add small strokes for detail.
Make sure you’re always testing your inking tools on a separate sheet of paper before starting work on your final product – that way there will be no accidental mistakes or frustrations later!
Styles of Ropes
There are many different styles out there, so don’t limit yourself by trying to stick with just one option. Ropes come in all sorts of shapes and sizes depending on what their purpose is.
Generally speaking, a rope should always have an S-shape curve somewhere in it – this helps give the illusion of coiling and thickness. It’s also important to make sure that the lines are not symmetrical because ropes tend to be messy!

Things You Will Need
For this tutorial, all you need is some paper (or sketchpad), pencils/pens/markers, an eraser if needed…and time! It’s always good practice before starting any new drawing session to pre-visualize what you want to accomplish and how to do it.
How to Draw Twisted Rope: Step-by-Step Tutorial
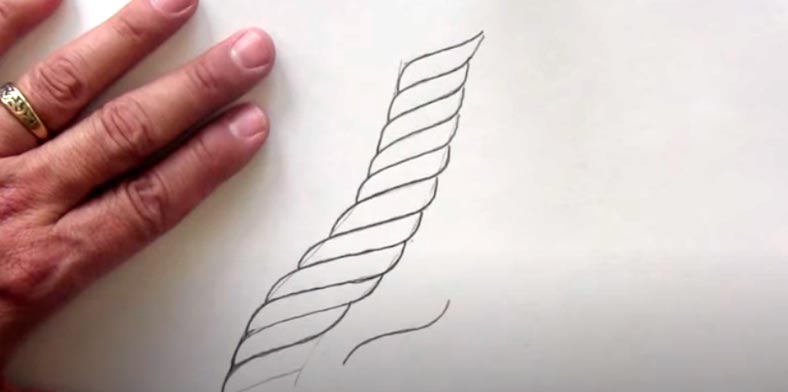
1. Decide how thick your rope will be. Whether it’s going to be lean and narrow, flat and round, or somewhere in between. Once that has been decided, draw the outline with two parallel lines using your pencil. Your line doesn’t have to look perfect at this point; just make sure there are no gaps where the rope isn’t supposed to go!

2. Draw diagonal lines. These lines on the ropes give them more of a three-dimensional look. Draw as many diagonal lines as you want, but try to keep it balanced and consistent across your rope.

3. Draw in some curves along the diagonal lines by adding gentle arcs from one end of the line to another. This makes your rope look more realistic.
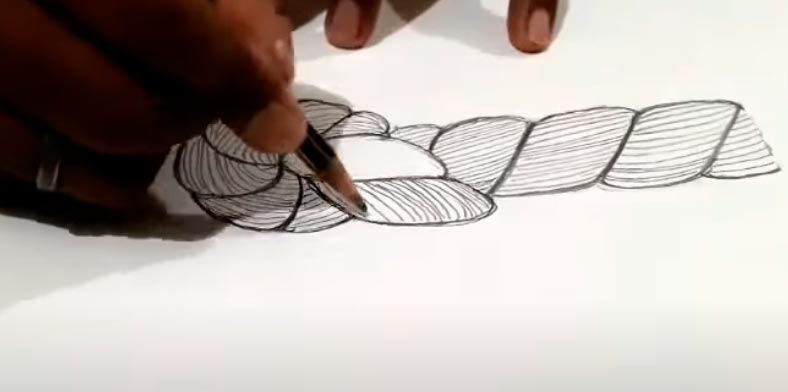
4. Add shadows with hatching marks that look like parallel slanting lines drawn close together or crossing long ways next to or at an angle against diagonals already there. Keep hatching towards the center so that it gives dimension to the rope.
Shading can make a drawing look more realistic, but it’s important to know when and how much to use! Make sure the edges look darker and get lighter towards the middle.

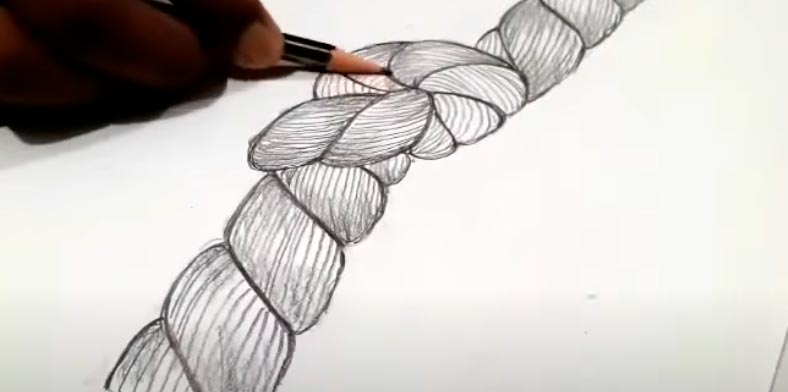
5. In this step, shade in between each little line that makes up our rope. Don’t go over every single line, just some of them. You can always add more later on but you cannot remove any without ruining the picture so be careful and take your time with this step!

Done! Now you know how to draw a rope. A handful of simple tips above will help you draw a rope with ease next time.
How to Draw a Knot in a Rope: the Basics of Drawing Knots
1. A rope is three-dimensional, which means it must be drawn with perspective. Perspective drawings are like looking through a window at your subject from an angle (source). In order to draw something in perspective, you first need to set up guidelines that will help you figure out how far away or close things should appear on the page.
Start by drawing dots across your piece of paper, dividing it into equal squares.
Once you have finished sketching out your object making sure everything is proportional (meaning each part looks correct when compared to another) you can erase those guidelines if needed.

2. Now, use the guidelines to draw a rope. Make the outline of the shape that will be in your knot. Draw this line lightly at first so that it can easily be erased if need be to redraw or fix anything!

3. Draw parallel lines with an elongated L shape crossing each line from opposite directions. Make sure the bottom part of your “L” shapes don’t cross too far into the other side otherwise they won’t look like individual loops when finished…just make them touch lightly along the edges if needed.

4. Now, let’s add perspective by drawing lines inside each loop. This is how something looks when it’s in three-dimensional space! If this doesn’t make sense now don’t worry; It will after practicing these steps over and over again for a while until they feel natural.
5. Add small lines to fill in some areas for more definition and depth by drawing short thin angles near intersections or along the rope.
6. Add some details to your rope knot to make it appear more realistic.

How to Draw a Rope Around an Anchor: a Simple and Easy-to-Draw Design
1. Draw the basic shapes and lines of an anchor in the center of your paper. This step may require some time before finally finishing off with an eraser if needed.

2. Draw a rope outline around the anchor. Once you got those down, start sketching out different parts of the rope, such as its ends, middle part, curves, etc.. using one of the methods shown above.

3. Now that our outline is complete, it’s time to add some color! Using the pencil still in hand, a shade over where there are gaps between the anchor lines but do not erase any parts of the line itself! This will keep your drawing looking neat and clean instead of sloppy which can sometimes happen if you use an eraser too much.
Continue this process until all white space has been filled up, then set down your pencil and pick up another color so we can start on the rope.

4. A good rope looks like it’s made of many individual strands that are twisted together. The more detailed your drawing is in this area, the better.
When you color in each strand with a different hue or shade, be sure to vary their intensity so some are darker than others for added depth and texture. Ropes will always look darker when their surface faces downwards while lighter if facing upwards.

5. Once all lines look solid again, pick up another color and get started shading everything that isn’t part of the rope or anchor.
For example: If there’s grass in our picture then put color on anything that isn’t green like dirt or rocks. This will give your drawing depth and dimension which makes it look better overall.

6. Now comes time for detail work where you can really let yourself show off as an artist! Think about how many different colors you want this beautiful piece of artwork to have throughout it; we suggest at least four but no more than six.
Once you have chosen the colors, pick up each one with your pencil and start filling in all of those little spaces that are left over from shading! You can take this step pretty quickly if you want to because it’s just background filler but take time when doing so or else everything will look very sloppy and unappealing which is something we don’t want at all!

7. Once our picture has been colored in completely (except for any additional shadows underneath), we need to add some finishing touches like highlights and detail lines. Highlight only the parts that stick out more than anything else.

Detail lines are just like shadowing but instead of adding color to parts that aren’t supposed to be there such as cracks in rocks, you’re putting it on top of existing colors which makes an awesome effect! These extra steps really do make a difference with pictures!
Tips for Drawing a Rope
- Always start with a rough sketch first. Getting the basic shapes down on paper before adding any detail will make it easier to draw and you’ll be able to work faster as well!
- Twist your rope at intersections or along its length for added depth and definition. If done correctly, this is one of the most important parts of making an awesome drawing so take some time practicing if needed!
- When shading, go lighter near where light would normally hit (e.g: top side) while darker on areas that receive shadows like under rocks or inside crevices. Make sure these two shades are layered over each other evenly though otherwise, they won’t look natural together which can ruin your whole picture beauty.
- When shading, cover up all the white space with your pencil first before coloring in anything. This will keep things looking neat and tidy instead of sloppy which can happen if you’re too lazy to erase!
- Don’t be afraid to use lots of colors so long as they aren’t too bright or flashy for this scene. Just remember that more is not always better so only choose between four and six hues max! Grab some color inspiration pictures from Google Images if you’re having trouble deciding what goes best together.
- Avoid using black unless it’s meant to represent shadows cast by something else like rocks or grass because otherwise, it makes everything looks unappealing and dark when it shouldn’t.
- If you’re drawing something that’s submerged in water then apply color to everything except the surface of what you want to be at the top (aka bobbing). This will make your picture look much more realistic than if you just drew a flat shape which is boring and uninspired!
- Don’t forget about highlights either because they can help add dimensionality, which makes things pop out better!! For example, draw thin lines on only the parts where light would reflect off like shiny or wet surfaces. You’ll see how well this works once you’ve finished shading.
- If you need to draw a really thick, heavy-looking rope, try using pieces of ripped-up textured paper instead of drawing with pen or pencil to get that tough guy feeling without having to spend hours perfecting every line! It’s quick and easy but still gives off all the same effects as drawing by hand would.
- If you’re doing a cartoon version, try using curved shapes instead of straight ones to shade inside parts of your rope so that they don’t appear too stiff or blocky. Use smooth, flowing lines to make your drawing look more natural instead of using harsh angles.
Final Words
To get the best result, take your time and follow all of these steps carefully. If you do it properly, you will soon be able to draw a rope like no other!
Practice makes perfect so keep practicing until you’re drawing ropes that look better than real-life ones! Good luck with your drawings, we hope this tutorial helped in some way because there are times when we don’t know how to start something new.