We are going to show you how to draw a coyote in this article. This is an animal that appears in many Native American tales and legends, so it’s not surprising that it’s one of the most popular animals to draw.
Drawing a coyote will also give you some insight into the type of creature they are: a clever trickster who can shapeshift or take on human form with ease! Read on for tips and tricks about drawing one of these fascinating creatures.
Coyotes in Folklore
Coyote is a common figure in the folklore and mythology of many Native American tribes, including those of the Shoshone, Crow, Sioux, Blackfeet Indians, and more.
There are several origins for this animal’s name; one myth tells how he earned his name by singing like (and fooling) the wolves at night – coyotes were also thought to be half-wolf themselves. This trickster spirit made him an important character in various stories told around campfires or during religious ceremonies; some myths even suggest that Coyote was responsible for creating humans!
Coyotes do not appear much in Western culture but they’re quite popular among indigenous Americans who often depict them as mischievous pranksters with supernatural powers.
Draw Your Own Version of a Coyote
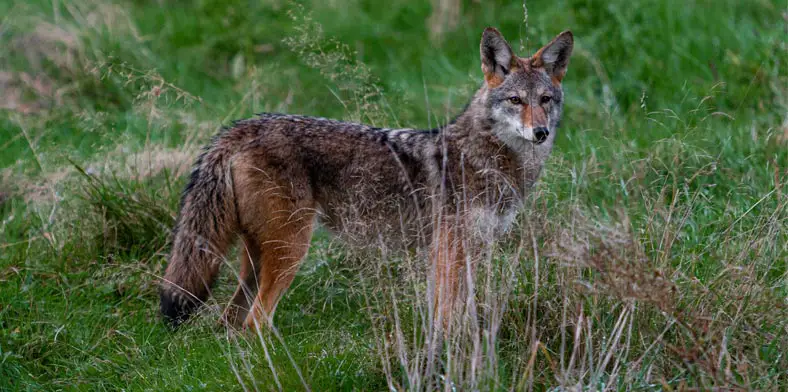
Practice drawing a few different types of coyotes. Draw them in profile, from the front and from behind. Try to capture their unique shapes and features on paper! A good way to practice is by looking at pictures of real-life coyote pups or even adult animals online, where you can get a great look at how they usually appear in nature.
This makes our job much easier. If we know what to look for, it’s not too hard to draw a coyote!
How to Draw a Coyote Face
The first thing to consider when drawing a coyote is its face. It has quite distinctive features! You can draw it as pointy and sharp, or you could choose to soften these angles by rounding off their edges. Think about how much of the face you want to show: just enough for your viewer to see that there’s an animal in front of them? Or do they need more detail so that we know exactly what kind of creature we’re dealing with?

Nose Shape and Fur
There are two main types of noses seen in drawings on real-life coyotes. There are some who have very long snouts covered completely in fur. Others have a small ridge of fur around the nose and cheeks but don’t cover it completely with their hair as some other canines do. You might need to think about where you want your coyote’s nose in relation to its eyes: this area is often quite dark so you’ll understand why many artists choose not to highlight this part of the face too much!
Coyotes are usually portrayed as having yellowish fur with black-tipped ears and tails.
Ears and Eyes
Drawing a coyote’s ears will be easy if you follow these simple guidelines: they’re triangular-shaped just like real ones are! If yours has long hair growing from them then remember that there should be more fur inside than outside. The same goes for the area around the coyote’s eyes, which is darker than much of its fur.
How to Draw a Coyote Body
Body Shape
Coyotes are smaller and slimmer than wolves so if your aim was to create something similar then you should be careful not to make it too chunky! You can still keep these lean muscles by drawing their limbs thicker at one end (such as shoulders) and tapering off towards the paws. If yours has long hair growing from its legs or belly then think about how this would affect where they’re standing – especially in relation to each other!
A slightly crouched pose will give them an air of mischief that suits well with their trickster nature. It might also help you avoid making your character look too heavy or bulky.

Legs and Paws
The legs of your character can be anything you want them to be! They’re often muscular with long, slender bones that are sharp at one end so don’t need toes or claws on all of them.
Like many animals in Native American tales and legends, the coyotes had the power of shapeshifting: which means that yours could have human-like characteristics such as hands instead of paws at any time!
Tail
The shape of your character’s tail will depend on whether they’re standing, crouching, sitting, or laying down – so you’ll definitely want to think about this! It can be long like some other dogs’ tails if it’s not moving around much but it might also be short when the animal is alert and listening for danger sounds. You could choose whether it’s straight or curved through careful observation of where it would naturally fall based on how your animal is standing.
How to Draw Fur
Coyotes have two layers of fur: a top layer that’s longer and acts as an extra coat during winter and then a softer, shorter layer underneath. You can choose to draw either or both!
When thinking about how your coyote is standing remember that there will be individual hairs on each part of the body so don’t try to cover every single area in detail unless you actually want them to! For example – areas such as legs might just need some patches around joints instead.
Another tip for adding realism is to think about where shadows and light would be cast on your animal. If they’re a darker shade it might make sense to draw lighter fur around their eyes and mouth, for example!
How to Draw a Cartoon Coyote
Coyotes don’t always have to look realistic! You can make yours stand out from the crowd with a more cartoon-like style if you like. For example, making their eyes bigger and adding some circular pupils is one way of achieving this effect – or giving them really long ears that stick straight up in the air (and even add antennae).
A stylized approach will work well for both humans and animals alike: especially since we’ve all seen examples of each in cartoons at least once before! If your coyote has black fur, draw large patches around its knees, elbows, belly, etc so it looks as though they’re wearing leggings/clothes rather than just bare skin. This simple technique gives the impression that they’re wearing clothes when in fact you’ve just put black patches onto the fur!

And remember – don’t forget about its tail! There are many examples of cartoon animals who have lost all sense of realism because their tails look nothing like real ones do… but that doesn’t mean yours should too! It might even make complete sense for your animal to not only have human hands and feet occasionally but also wear clothes: such as a hat or a scarf.
For more inspiration check out our How to Draw Tears tutorial to help you improve your drawing technique.
How to Draw a Realistic Coyote: Step-by-Step Tutorial
Now that we’ve covered the basics of how to draw a coyote, let’s try and put it all together into one step-by-step tutorial.
1. Draw two circles as guides for a coyote’s body. They don’t have to be perfect. The circles should be around the same size. Don’t draw them too far apart otherwise, your coyote will end up too long. Leave enough room on the sides for the head and tail.

2. Draw another circle on the top left side. This will act as your guide when you come to draw in the head. The circle you draw should be almost touching the previous one.

3. Draw two curved intersecting lines inside the head to help you draw the facial features later on.

4. Draw a small arc on the outside of the circle on the lower left side as a guide for the muzzle. You can make this shape fairly thin because this animal has a slender snout.

5. Draw two triangle shapes on both sides of the head as guides for the ears. Coyotes have triangular ears which are often depicted as poking upwards.

6. Draw four lines under the body (two below each big circle) as guides for the legs. The coyote will be moving forward in mid-stride, so pay attention to the shape of the guidelines. Bend the lines to indicate where the joints and the paws will be.

7. Draw the series of lines that connect the basic shapes to form the rest of the body. Two lines in the front form the neck and two more in the middle form the torso. Add another line on the right side as a guideline for the tail.

That’s it for the initial sketch! Now it’s time to move on to the next step – start by adding some basic shapes within the guidelines drawn previously. These represent parts of the body that you should turn into smooth lines if possible. Don’t worry about making them perfect at this stage – use them for practice instead!
8. Lightly sketch the eyes inside the head using the lines as guides for placement. Darken the outline for the eyes once you get the placement and shape right. Make the outlines of the eyes thicker to give them a darker edge. Add a small dot inside each eye for the pupils. Shade the inside of the eyes using a value that’s lighter than the pupils. Leave a tiny circle unshaded inside each eye to represent glare.

9. Draw the nose on the tip of the arc on the left side. First, slightly sketch a circle at the tip of the muzzle. Then darken the edges by following the path of the circle and adding the nostrils as you go along. Make the bottom of the nose pointer and add a small line. Use a few quick short strokes at the top to represent fur.

10. Draw the rest of the muzzle using the arc as a guide. Draw a line that connects the eye and the nose for the top part of the muzzle. Now draw in some lines within your character’s face to indicate their mouth and lower jaw. Use quick, short strokes for a furry texture.

11. Use the arcs on the top of the head as guidelines to draw the ears. Darken the edges of the arcs and make them a bit rounder. Add a few quick, short strokes inside for the fur.

12. Next up we’re going to work on the head. Use the original circle as a guide to draw the rest of it. Follow the basic shape of the circle but use quick, short strokes as you darken the lines for a furry texture. Start drawing the neck and the lower side of the head.

13. Draw the front legs using the lines on the left side as guidelines. Sketch the shape of the legs as you follow the basic lines. When you get the shape of the leg right, darken the lines. Add a few curved lines at the tips of the paws for the claws. The coyote is stepping forward so draw the paw pointing down.

14. Now use the lines on the right side to draw the hind legs using the same technique. The top part of the legs should be a lot thicker than the front legs.

15. Draw the rest of the body and the tail using the basic shapes as guidelines. Make the tail bigger and fluffier by adding furry texture that is meant to help camouflage coyotes.

16. Erase the guidelines for a cleaner look and redraw any final sketch lines you may have accidentally erased.

17. Add some shading to your drawing to give it more dimension and volume. Pick the direction of the light source when shading. Vary the pressure of your pencil to get different tones. This is where you can also add some darker if you want your coyote to appear more shadowy.

18. Add a shadow underneath your coyote so it doesn’t appear to be floating.

19. Add more shading to your coyote to give it a more furry texture. Use strokes that go in the general direction of the fur. Continue adding strokes until the entire body is covered. Shading can be time-consuming so be patient and take breaks.

You might also be interested in our article about How to Paint a Sunset.
Tips on Drawing a Coyote
Now that you’ve read our tutorial it’s time for some last-minute tips to help ensure your drawing is looking great before we move on:
- Start with reference photos and sketches.
- Draw basic shapes within your guidelines to represent parts of the body such as legs, face, and pointy ears. Don’t worry about perfection at this stage – practice makes perfect!
- Don’t forget about perspective when designing an animal character! If you’re having a hard time drawing a leg that looks right from every angle, you can still draw it as a stand-in shape until you figure out the right placement.
- If you’re having trouble thinking of what to draw next then look at your animal from different angles and try drawing them in different positions! It can be helpful to think about how each body part would move if the character was walking, running, laying down, etc, and use this as inspiration for their pose.
- When sketching out your coyote’s face keep lines light until you’ve decided where its mouth is because that’ll determine whether they have fur above it or not!
Remember that all of these tips can apply to any animal or person – not just a coyote! You can use this information when drawing anything from humans and dogs to monsters and aliens (well… maybe not aliens) because they’re universal guidelines for creating solid artwork in general.
Final Words
Drawing is fun because even though there are rules involved, you can break them whenever you like. As long as your animal still looks like what it’s meant to be (e.g., a coyote) then feel free to experiment with different styles and techniques – including completely ignoring some of the advice given here if you want! The only limitations are your imagination… so get out there, draw lots of cool animals and have fun doing so!